Rooting your Samsung Galaxy S3 GT-I9300 international variant will grant you permissions / access to modify system files and Flash Custom ROM as well as custom recoveries. This guide is intended for advanced users, therefore beginners should read and implement it with due care. Rooting your Android phone will void its warranty.
You must not use these rooting files with any other variant of Galaxy S3 nor any other phone. As every phone has different rooting archive that needs to be flashed on the phone using ODIN Flashing Tool. Failing to implement this guide may brick your phone, so please be cautious.

We will be using CF-Auto-Root by ChainFire to Root Samsung Galaxy S3 GT-I9300. CF-Auto-Root contains the stock recovery that means after rooting your phone, you will still be having the stock recovery. Benefit of having a stock recovery is that your phone’s flash counter will not exceed. While if you need to flash CWM or TWRP recovery on your phone, it will be increasing the flash counter and a triangle may appear on your device showing that it has been modified. Triangle Away could be used to remove it. Rooted devices are unable to receive OTA updates since they will show system modified status. This rooting guide is intended to work with Windows Based Computer. All credit of CF-Auto-Root goes to ChainFire.
Steps to Root Galaxy S3 GT-I9300 on Android Jelly Bean 4.3
1. Make sure that your computer have USB Drivers installed for Galaxy S3 GT-I9300. Your phone should have enough battery life around 70 – 80 percent. Backup your important data from internal memory to avoid any substantial data loss. Verify your phone model to be Galaxy S3 GT-I9300 and Android version 4.3 as this guide is only intended for International Unlocked version of device. You can verify it from Settings > About Device > Model Number. Flashing rooting files on wrong device will brick it.
2. Enable Developer Options on your phone through Settings.
(How to enable Developer Options? Go to Settings > About > Build Number – Tap on Build Number 7 Times and Developer Options will be activated on your device)
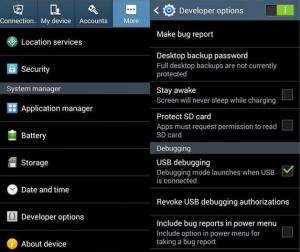
3. Now you have to Enable USB Debugging from Developer Options.
(Settings > More > Developer Options > Enable USB Debugging)
5. You will find two folders after extraction, one has Root File while other has ODIN flasher.
6. Open ODIN folder and Right Click on Odin3 v3.07.exe and Run as an Administrator.
7. Power Off your Galaxy S3 GT-I9300 and Boot it into Download mode using three button combination. Home Key + Power Key + Volume Down Key (Press and hold these three keys until your device boots into download mode) Once booted into Download mode, hit volume up key to continue and connect your PC & Phone with USB data cable.
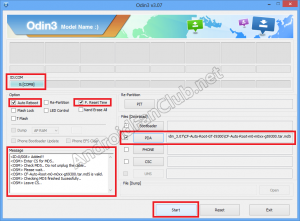
8. Once you have connected your Galaxy S3 GT-I9300 in Download Mode with your PC running ODIN 3.07, you will see COM Port color to be turned into light blue. Make sure only two options are checked i.e, Auto Boot and F. Reset Time. Now Click on PDA and select CF-Auto-Root-m0-m0xx-gti9300.tar.md5 root file from CF-Auto-Root-GT-I9300 folder (which we had extracted in step 5).

9. Now Hit Start and you will see your Galaxy S3 GT-I9300 started to be flashed with Root file in download mode. Upon successful flashing of root file, your phone will reboot and you will observe SuperSU app on your phone’s app drawer and that means your Galaxy S3 GT-I9300 has been successfully rooted.
Warning & Disclaimer: I will not be responsible if anything goes wrong by following this guide, you have to follow it at your own risk and this process of rooting will void your phone’s warranty. Its better to root your device when your phone’s warranty period is over.


